Saturday, January 1, 2022

Setting Flexible Goals

Setting Flexible Goals

In the past, I had made several attempts to hike/walk 10,000 steps a day - every day - for an entire year. By the 3rd week in January, I would typically miss a day due to various reasons or excuses. Once a day was missed, the long term goal was missed, and further motivation to exercise was lost.

In 2021, I made two modifications to the plan. The goal was changed to 70,000 steps per week, and every day I read the following words which were summarized from the book “Atomic Habits” by James Clear:

  • It takes 1 month to make or break a habit
  • Plan for failure: If you miss a day, get back on track immediately
  • Whenever there is a gap between your habits and goals, habits will always win: Identify and fix the gaps

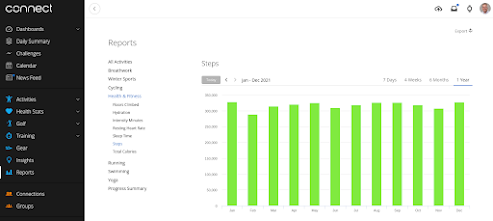
Changing to a weekly vs. daily goal allowed for some flexibility. If I missed the average daily number of steps, I resolved to make up the shortfall in the remaining days that week. And I could build up a surplus of steps early on to help with an off day later that week. Since making these changes just over a year ago, I have met my goal of hiking/walking 70,000 or more steps per week for 53 consecutive weeks!


There was more than one Sunday when I had to walk ~9 miles in a cold rain to meet my weekly goal. And with this flexible goal I was able to spend more time with my 98 year old father when he fell ill and eventually passed in July, while still reaching my goal. As important as your goal may seem when you set it, more critical and unexpected issues are likely to arise, and you should build in the flexibility to deal with these circumstances when they happen without giving up on your goal.

This year, I’ll be switching my weekly goal to reach 500 “intensity minutes” (as measured by my Garmin fitness watch) rather than steps so that in addition to continued hiking and walking, activities like cycling, kayaking, disc golf, and yard work can be added to my activities. And I plan to apply the same flexible system to other goals such as eating healthier and work related training & certifications.

In summary: Making small changes to goals that allow for flexibility can make the difference between achieving or failing at that goal.

Saturday, April 4, 2020

COVID-19 Montana Mask

COVID-19 Montana 3D Printed Mask

Me Wearing Mask
Updated: 2020-04-11

The COVID-19 pandemic has caused a worldwide shortage of personal protective equipment (PPE) for hospital staff and the general public. I’ve been experimenting with printing different 3D mask designs, but most of them had to be custom formed after printing or just didn’t work. Then, I found the following short video by Dr. Dusty Richardson, MD on the Montana Mask:

Montana Mask Walkthrough

That video led me to these websites, which contains additional info about the masks and how to make them:

Billings Clinic 3D Printed Surgical Mask

Make The Masks

The URLs on that website to download the STL files required for 3D printing didn’t resolve, but I was able to find them elsewhere and they can be downloaded here.

3D Printer Settings

I used 3D Simplify and the following settings to print these masks:

  • Filament Type: PLA
  • Infill: 0.25
  • Layer Height: 0.1 mm
  • Rotate the mask image so that the front lies flat on the printing bed
  • No supports

You can find the 3D Simplify factory file modified with the above settings here

Ready to Print x3g Files

If you have a Makerbot dual extruder or compatible printer, I’ve created ready to print x3g files that include both the mask and the filter frame. I also scaled down the original size mask (large - 100%) to a medium size (95%) and small size (90%). You can place the appropriate x3g file directly on an SD card and print - no computer required:

Large Mask and Filter Frame printed using Left Extruder
Large Mask and Filter Frame printed using Right Extruder
Medium Mask and Filter Frame printed using Left Extruder
Medium Mask and Filter Frame printed using Right Extruder
Small Mask and Filter Frame printed using Left Extruder
Small Mask and Filter Frame printed using Right Extruder

Each mask and filter frame takes about 4 hours to print, and I’m currently printing 3-4 a day.

Installing and Replacing the Filtration Material

Most suppliers of N95 filtration material such as this one are either out of stock or just supplying first responders, who should get preferential treatment. I’m using blue shop towels as well as the filtering material from 3M Filtrete 1500 furnace filters. Here’s a comparison of what common materials filter:

  • N95 masks: 0.1 - 0.3 microns
  • Blue shop towels: 0.3 microns
  • 3M Filtrete material: 1-3 microns
  • Cloth face mask: 20 microns
  • Coffee filter: 20 microns

While blue shop towels do a good job of filtering small particles, they’re fairly restrictive. The 3M Filtrete material is easy to breathe through even when doubled up. I plan to use the blue shop towel for short trips to the store, and 2 layers of 3M Filtrete material for extended use.

Cut the filtration material to the following size to use with the mask, and use 2 layers:

  • Large: 2.75" x 2.75"
  • Medum: 2.6" x 2.6"
  • Small: 2.5" x 2.5"

Make sure to mark the airflow direction on the 3M filter before removing the material, and face the tip of the arrow side towards the inside of the mask. Wrap the material around the small square frame and press into place from the inside of the mask.

Installing and Testing the Seal

I used 5/16-in White Window Weatherstrip and Loctite Super Glue to make a seal around the edge of the mask. This video shows how to install it properly.

You can test the seal by putting the mask on, sealing the opening by holding your hand over it, and trying to breath in and out to see how much air enters or escapes. With the large mask, I had a pretty good seal with no weather stripping, and a complete seal with weather stripping. For men, shaving will help.

Installing the Rubber Straps

With everyone making cloth masks, traditional elastic materials are hard to come by. I’m using 0.2" natural latex rubber tubing. Cut two lengths 15" long. Cutting on an angle makes it easier to thread the tubing through the eyelets in the mask. Put one on each side, and if you want to wrap the tubing around your ears to hold the mask in place, you’re done:

Adjust the straps by pulling the slack through the eyelet. If the mask won’t stay in place, cut another 11" piece of surgical tubing and use it to tie between the existing straps to wrap around your head: